Accessory dwelling units have surged in popularity as homeowners look for rental income, guest housing, or multi-generational living solutions. But building the structure is only half the battle, interior design determines whether a 400-square-foot unit feels cramped or comfortable. Unlike traditional home design, ADU interiors demand ruthless editing, strategic storage, and layouts that earn every inch. The constraints are real: tight footprints, limited natural light, and zoning-mandated ceiling heights. Yet with smart planning and the right design moves, an ADU can rival the functionality of a full-sized home while maintaining a distinct sense of space and style.
Key Takeaways
- ADU interior design success depends on strategic layout planning that eliminates dead space through pass-through designs, pocket doors, and multi-functional zones instead of traditional hallways.
- Vertical storage, built-in cabinetry extending to the ceiling, and multi-purpose furniture are essential in ADU interior design to compensate for the lack of basement or attic overflow space.
- Open-concept layouts amplify perceived space and improve natural light distribution in ADUs, while partial dividers or pocket doors can create privacy without blocking sightlines in smaller units.
- Smart appliance selection—such as 24-inch ranges and dishwashers combined with counter-depth refrigerators—maintains full kitchen functionality within ADU footprints of 60 square feet or less.
- Layered lighting with dimmers, natural light sources like skylights, and the 60-30-10 color rule (keeping 60% of walls light and neutral) visually expand small ADU spaces and reduce the cramped feeling.
- Code compliance and plumbing placement require careful planning upfront; stacking plumbing against the kitchen wall reduces costs, while proper insulation in shared walls (R-13 or better) prevents noise transfer between zones.
What Makes ADU Interior Design Unique
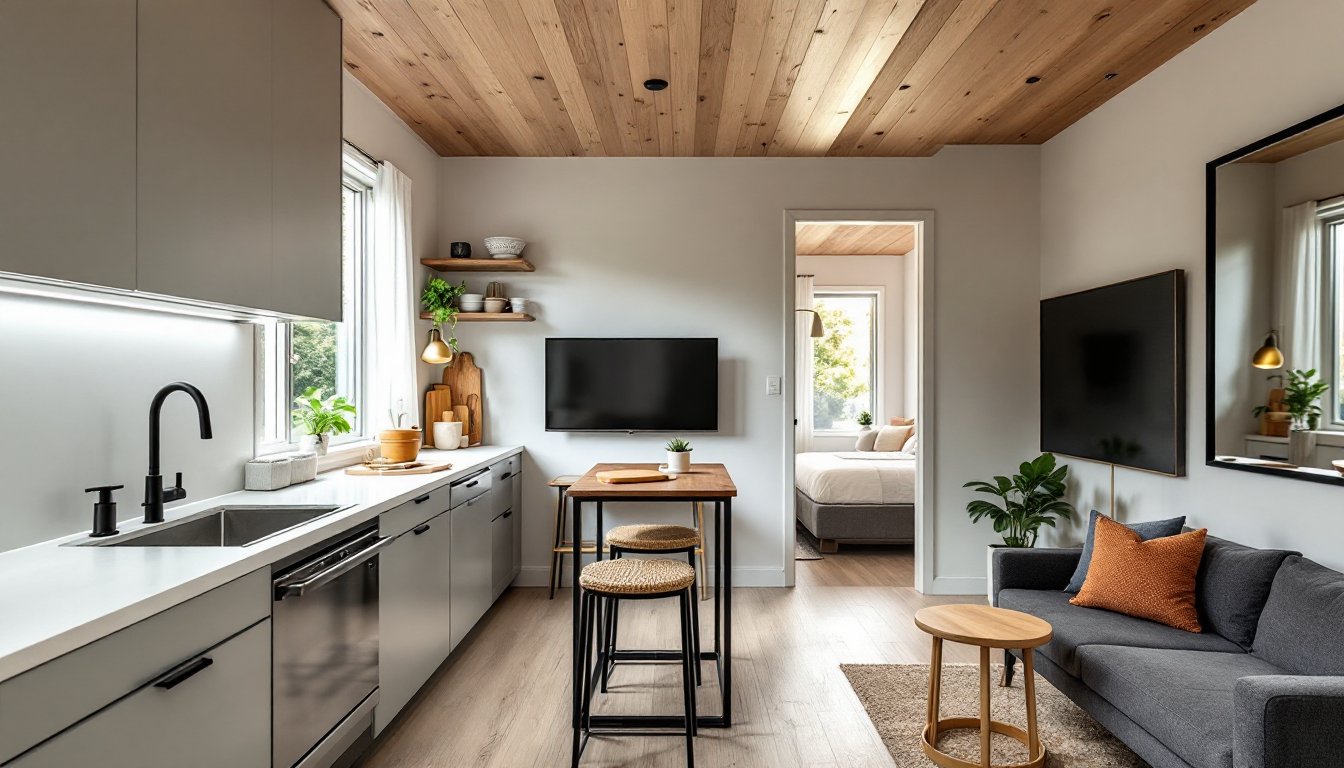
ADU design operates under constraints that don’t apply to primary residences. Most jurisdictions cap ADU square footage between 400 and 1,200 square feet, and many restrict building height to one story or a story-and-a-half. That means designers can’t simply scale down a three-bedroom floor plan, they need to rethink spatial hierarchy entirely.
Code compliance shapes every decision. Egress windows must meet IRC minimums (typically 5.7 square feet of opening), ceilings in habitable rooms generally require 7 feet minimum clearance (though some lofts allow 6’8″), and kitchens need adequate ventilation tied to cubic footage. These aren’t suggestions, inspectors will flag undersized windows or improperly vented ranges.
Another differentiator: ADUs often lack basements or attics, eliminating the overflow storage most homes rely on. Every closet, every cabinet, and every vertical inch must work harder. That pressure forces designers to integrate storage into walls, under stairs, and within furniture itself.
Finally, ADUs typically serve diverse users. A unit might house a college-age kid one year, an aging parent the next, then convert to a rental. Flexibility trumps highly personalized design. Neutral finishes, adaptable layouts, and universal design principles, like curbless showers and lever hardware, extend an ADU’s functional lifespan and appeal to a broader tenant pool.
Planning Your ADU Layout for Function and Flow
Layout planning starts with the entry sequence. Where does someone drop keys, kick off shoes, or hang a coat? A 3-foot-wide mudroom nook or built-in bench with hooks underneath handles this without consuming an entire room. Skip this step, and clutter colonizes the kitchen counter within a week.
Next, map circulation paths. In units under 600 square feet, hallways are dead space. Instead, use pass-through layouts, where the living area flows directly into the kitchen, and the bedroom sits behind a pocket door or barn door off the main zone. This approach sacrifices some acoustic privacy but maximizes usable square footage.
Bathroom placement matters more than many realize. Stacking plumbing against the kitchen wall cuts costs and simplifies rough-in, but it can also create noise transfer. A well-planned layout considers whether the bathroom shares a wall with the sleeping area or living space, then specs insulation accordingly (add R-13 or better in shared walls for sound dampening).
Open Concept vs. Defined Zones
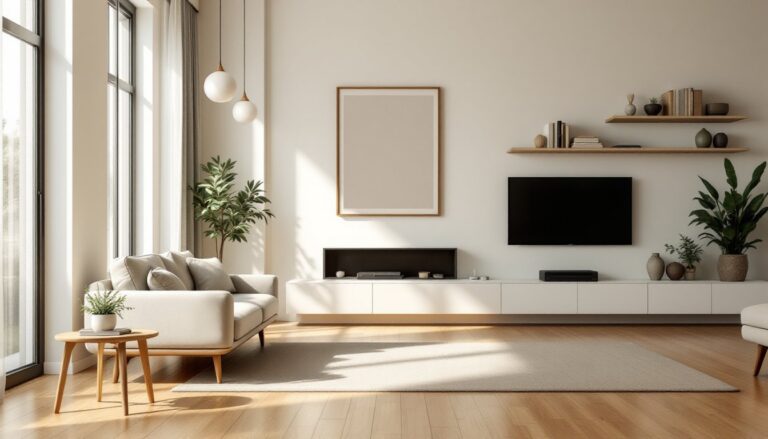
Open-concept layouts dominate ADU design because they amplify perceived space. Removing partition walls between the kitchen, dining, and living areas creates sightlines that make 450 square feet feel closer to 600. It also improves natural light distribution, critical when window count is limited.
But open plans aren’t universal solutions. A studio ADU housing a remote worker needs separation between the “office” and “bedroom.” Here, partial dividers work well: a half-wall with a built-in desk or a floor-to-ceiling bookshelf that stops 18 inches from the ceiling. These define zones without blocking light or airflow.
For one-bedroom ADUs, a pocket door between the bedroom and main living area offers the best of both worlds, open when hosting, closed for privacy. Avoid traditional swing doors in tight spaces: they claim 10–12 square feet of clearance arc. Barn doors look clean but offer zero sound isolation, so they’re better suited for closets than bedrooms.
Space-Saving Design Strategies for Small ADUs
Small ADUs demand design moves that do double or triple duty. Start with vertical space. Floor-to-ceiling cabinetry in kitchens and closets captures storage that typical 30-inch uppers leave behind. Extend shelving to within 6 inches of the ceiling, yes, you’ll need a step stool for the top shelf, but that’s where seasonal items live.
Under-stair storage is another high-value zone if your ADU includes a loft or second-story sleeping area. Custom pull-out drawers or a coat closet tucked beneath the treads can recover 15–25 cubic feet. Even a shallow 8-inch niche works for shoe storage.
Murphy beds and wall-mounted desks remain controversial. Done well, they’re space savers: done poorly, they’re mechanical headaches. If going this route, invest in quality hardware (look for systems rated for 1,000+ cycles) and ensure the wall is framed with solid 2×6 or 2×8 blocking behind the mounting points, not just drywall anchors.
Another tactic: design around standard material dimensions to avoid waste and custom cuts. Drywall comes in 4×8 sheets, plywood in 4×8, and most tile in 12-inch or larger formats. Planning room dimensions in 2- or 4-foot increments reduces labor and material costs.
Multi-Functional Furniture and Built-Ins
Freestanding furniture eats space. Built-ins earn it back. A window seat with lift-top storage offers seating, storage, and a reading nook in one 18-inch-deep footprint. A kitchen island with open shelving below can double as a dining table if you spec it at 30 inches high instead of the standard 36-inch counter height (or make it adjustable).
Platform beds with drawer bases are workhorses in ADU bedrooms. Instead of a boxspring and frame that trap dead air, a platform with four to six drawers replaces a dresser. Spec soft-close slides rated for 100 pounds if storing books or tools.
In the living area, ottomans with hidden storage and nesting tables let occupants scale furniture to the activity. Hosting guests? Pull out the extra table. Solo Netflix night? Nest them to open floor space. These design strategies help small footprints adapt to shifting needs without requiring a furniture overhaul.
One caveat: built-ins tie design to structure. If a future tenant hates your built-in banquette, they’re stuck with it. Balance permanence with flexibility, anchor the big pieces (kitchen island, closet systems) and leave room for renters to bring their own personality through movable furniture and decor.
Kitchen and Bathroom Design Considerations
ADU kitchens rarely exceed 60 square feet, so the work triangle (sink-stove-fridge) compresses into a work line. Galley and L-shaped layouts dominate. In a galley kitchen, keep the aisle at least 42 inches wide if two people will cook simultaneously: 36 inches works for single cooks but feels tight.
Appliance selection makes or breaks small kitchens. A 24-inch range and 24-inch dishwasher maintain functionality without the bulk of 30-inch models. Refrigerators are trickier, counter-depth models (24 inches deep) look integrated but sacrifice 3–4 cubic feet of capacity. For rental ADUs, a standard 30-inch fridge (around 18–20 cubic feet) offers better value.
Counter space is precious. Aim for at least 24 inches of landing area on one side of the sink and 18 inches on the other. If space is tight, a cutting board that slides over the sink or a flip-down countertop extension buys prep room when needed. Skip the decorative backsplash cutouts, continuous counter-to-cabinet coverage maximizes usable surface.
Bathrooms in ADUs typically range from 35 to 60 square feet. A 5×7 layout can fit a 60-inch tub/shower combo, toilet, and vanity if you’re strategic. Swap the tub for a corner shower, and you can upgrade to a roomier 36-inch vanity or add a linen closet.
Ventilation is non-negotiable. IRC requires either an operable window (minimum 3 square feet) or a mechanical exhaust fan rated for the room’s cubic footage. Most inspectors want to see 50 CFM minimum: for a bathroom with a shower, 80 CFM or an intermittent fan tied to a humidity sensor is better for moisture control.
Material choices matter here. Porcelain tile or luxury vinyl plank (LVP) hold up better than cheap laminate or peel-and-stick in high-moisture zones. Interior design budgets for ADUs often prioritize durable finishes in kitchens and baths over statement pieces in living areas, smart money goes where wear happens.
Lighting, Color, and Materials That Expand Your Space
Lighting layers, ambient, task, and accent, apply in ADUs just as they do in primary homes, but the stakes are higher. A single overhead fixture in a 400-square-foot studio creates harsh shadows and kills depth. Instead, use a mix: recessed LED downlights (4-inch cans on a 4- to 5-foot grid) for ambient light, under-cabinet LED strips in the kitchen for task lighting, and a swing-arm reading lamp or picture light for accent.
Dimmer switches are inexpensive upgrades that let occupants adjust mood and perceived space. Bright light (3000–4000K color temperature) energizes work zones: warm light (2700K) softens living and sleeping areas. Avoid cool white (5000K+) in residential ADUs, it reads clinical.
Natural light is the ultimate space expander. If zoning and structure allow, add a skylight in hallways, bathrooms, or lofted sleeping areas. A 2×4 skylight can equal the light output of two windows, and it doesn’t compromise wall space or privacy. Install it on the south or west side for maximum gain (north for softer, consistent light).
Color strategy starts with the 60-30-10 rule: 60% dominant (walls), 30% secondary (upholstery, cabinetry), 10% accent (pillows, art). In small ADUs, keep the 60% light and neutral, whites, soft grays, or warm beiges reflect light and recede visually. Darker accent walls can add depth but use them sparingly, one feature wall in the living area, not every room.
Materials should balance aesthetics and maintenance. Engineered hardwood or LVP works better than solid hardwood in ADUs with limited climate control, it resists expansion and contraction. For countertops, quartz outperforms laminate in durability and resale appeal, though it costs more upfront ($50–$80 per square foot installed vs. $20–$30 for laminate).
Finally, reflective surfaces multiply light. A large mirror (30×40 inches or bigger) opposite a window bounces daylight deeper into the space. Glass-front cabinets, glossy tile, and metallic fixtures all contribute to a brighter, airier feel. Just don’t overdo it, too much gloss can feel cold. Mixing textures such as design presentation materials keeps a space visually interesting without cluttering it.